Customize project components
| Suitable Enviroment | SaaS |
| Private Deployment |
Requirements
| ONES |
|---|
| v3.11.16+ |
Overview
The plugin uses this ability to add custom components to the project of the ONES, and users can use it according to the uniform standard of the ONES -- the order of custom components in the navigation bar and the basic configuration.
Plugin developers can customize the content of the component
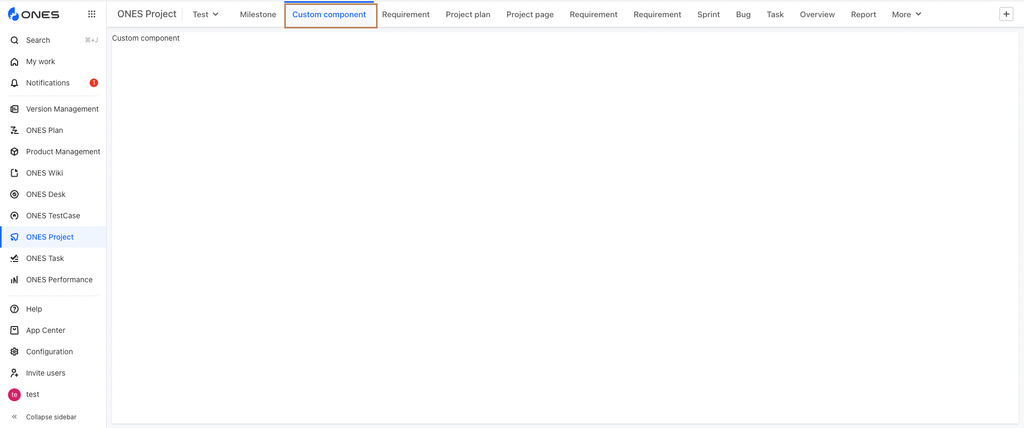
Custom components are used in the same way as other components

Properties of custom components
- Users can customize the UI and functionality of the component;
- Support user to configure component name and component description;
- When the plugin that hosts this ability is enabled, the custom components defined by this ability will appear in the component library of each project, and users can use these components according to the uniform standard of the ONES;
- When the plugin that hosts this ability is unabled/uninstalled, the custom components defined by this ability and the objects created by the user using these components are deleted from the project;
- Allows developers copy the contents of custom components between different projects;
Scenes for custom components
- Functional scenarios that cannot be satisfied by the existing components of the ONES;
- User-defined more diverse project configuration requirements scenarios
Use ability Plugin multilingual support if custom components need to consider multilingual scenarios
This ability must be used in conjunction with the front-end slot ones:project:component:new
Usage
To use this ability,developers need to add the backend ability Custom project components and the front-end slot ones:project:component:new,and then implement your own custom component function in the code.
Step 1:Add and use ability through the OP tool
Use the Command Line to enter the OP command in the plugin root directory to add ability (this directive requires OP tool version 1.0 or above)
npx op add ability
Select and add project-custom-component@1.0.0, fill in the name of the relate slot ones:project:component:new according to the prompt.
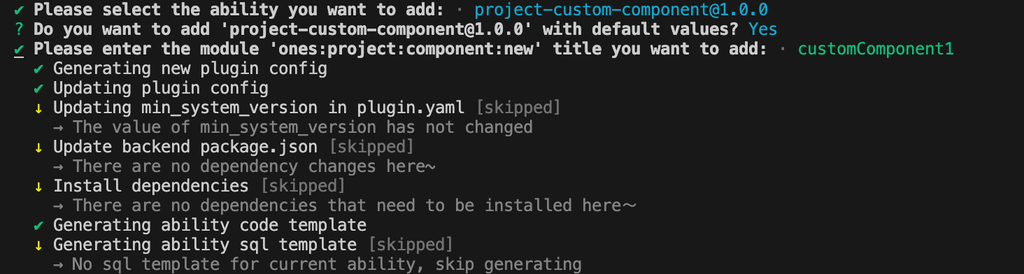
the OP tool will add the following to the plugin
-
The OP tool adds
abilitiy,modulesfield related paragraphs in{{plugin root directory}}/config/plugin.yamlservice:
app_id: ...
name: ability-project-custom-component
...
...
modules:
- id: ones-project-component-new-weUW
title: customComponent1
moduleType: ones:project:component:new
entry: modules/ones-project-component-new-weUW/index.html
abilities:
- id: ...
name: project_custom_component_test
version: 1.0.0
abilityType: ProjectCustomComponent
function:
#Name of the plugin data copy method
copyPluginData: copyTest
relateModule:
#Custom component entry
componentModuleEnter: 'ones-project-component-new-weUW'
config:
- key: component_name
label: project custom component
value: project custom component
fieldType: Input
show: true
- key: component_desc
label: custom component description
value: ''
fieldType: TextArea
show: true
props:
placeholder: custom component description,allow to leave blank
- key: is_support_copy
label: is_support_data_copy
#If the value is set to true,need to complete the copytest method
value: true
fieldType: Switch
show: false -
The
ones-project-component-new-weUWdirectory is created inweb/src. -
The
project-custom-component.tsfile is created inbackend/srcdirectory.If the developer wants to implement the data replication function of custom project components among multiple projects, the developer can do it in thecopyTestmethod in this file.import { Logger } from '@ones-op/node-logger'
import type { PluginRequest, PluginResponse } from '@ones-op/node-types'
// Wants to implement the data copy of the custom component, it needs to be done within this method.
export const copyTest = async (request: PluginRequest): Promise<PluginResponse> => {
Logger.info('copyTest enter')
const body = request?.body as any
let srcProjectUUID = body.srcProjectUUID
let dstProjectUUID = body.dstProjectUUID
Logger.info(
'[Plugin] copyTest',
'url:',
request.url,
'srcProjectUUID:',
srcProjectUUID,
'dstProjectUUID:',
dstProjectUUID,
)
return {
body: {
code: 200,
body: {
state: 0,
message: 'success',
},
},
}
}
New feature: Official product data mapping
| Version Series | Version |
|---|---|
| v6.1.x | v6.1.88+ |
| v6.2.x | v6.2.22+ |
Several properties are added to the parameters for copyPluginData method to describe the copy action more completely, and support official product data mapping.
The modified request body is as follows:
{
  "srcProjectUUID": "source project UUID",
  "dstProjectUUID": "target project UUID",
  "dstProjectOwner": "User UUID of the operator",
  "jobUUID": "UUID of the copy job", // Used to obtain the official product data mapping file
  "fileKeys": ["relation"] // Currently a fixed value, used to obtain the official product data mapping file
}
The method to obtain the official product data mapping file is as follows:
const urlResponse = await OPFetch(
  `/team/${globalThis.onesEnv.teamUUID}/queue/${jobID}/file_download/url`,
  {
    params: {
      file_key: 'relation',
    },
  },
)
const fileResponse = await OPFetch(urlResponse.data.url, {
  responseType: 'text',
})
This file contains uuid mappings for all entities generated during the copy process, in CSV format.
There are two types of lines in the file:
- Type identifier: Only one column, the lines below the type identifier belong to this type of mapping relationship, until the next type identifier or the end of the file
- Mapping relationship: Two columns, the first column is the source object UUID, and the second column is the UUID of the copied result object
Step 2:Complete the function of custom components
In step 2,developers need to complete their own custom component function design according to their actual needs.
Component design
web/src/modules/ones-project-component-new-weUW/index.tsx
import React from 'react'
import ReactDOM from 'react-dom'
import { ConfigProvider } from '@ones-design/core'
import './index.css'

ReactDOM.render(
  <ConfigProvider>customComponent1</ConfigProvider>,
  document.getElementById('ones-mf-root')
)
web/src/modules/ones-project-component-new-weUW/index.css
#ones-mf-root {}
Custom component data replication function
Developers need to complete their plugin data replication logic in the copyTest function under the file backend/src/project-custom-component.ts.
Step 3:Install and enable the plugin
Install and enable the plugin, if the abilities.relateModule.componentModuleEnter configuration is not filled in under config/plugin.yaml,it will cause a mistake.
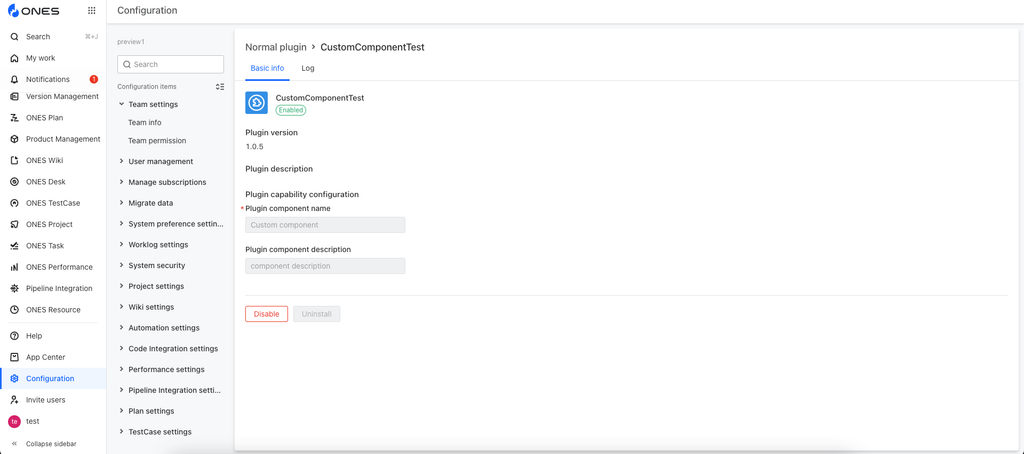
You can configure the name and description of custom components on the plugin details page in Configuration -> Plugin Management-> Normal plugin, as shown in the following figure.
In the left column of ONES Project->{{any Projec}}-> Setting -> Componennt , the custom component is located in plugin component title and is used in the same way as other components