Installation
Overview
Before doing plugin development, you need to make some preparations for the environment.
Requirements
| Node.js |
|---|
| v16.13.0+ |
Installation
Step 1: Install Node.js
ONES plugin development requires Node.js v16.13.0 or higher, You can use n, nvm or nvm-windows to manage multiple Node versions on the same computer.
Step 2: Install cmake or node-gyp
Mac/Linux install cmake
In the process of initializing the plugin project, ONES CLI will install the /backend of the project depending on it, and the dependent installation exception may occur in the process.
This is because some of the dependencies required for plugin development use the CMake tool. Therefore, if the project depends on an exception during the installation process, you need to install the CMake tool.
Install for brew
brew install cmake
Install for dmg
It is recommended that you install stable version 3.22:cmake-3.22.2-macos-universal.dmg
After the dmg installation is complete, you need to execute the command to complete the installation process:
sudo "/Applications/CMake.app/Contents/bin/cmake-gui" --install
Password:
Output:
Linked: '/usr/local/bin/cmake' -> '/Applications/CMake.app/Contents/bin/cmake'
Linked: '/usr/local/bin/ctest' -> '/Applications/CMake.app/Contents/bin/ctest'
Linked: '/usr/local/bin/cpack' -> '/Applications/CMake.app/Contents/bin/cpack'
Linked: '/usr/local/bin/cmake-gui' -> '/Applications/CMake.app/Contents/bin/cmake-gui'
Linked: '/usr/local/bin/ccmake' -> '/Applications/CMake.app/Contents/bin/ccmake'
Check that the installation is successful:
cmake --version
# cmake version 3.22.2
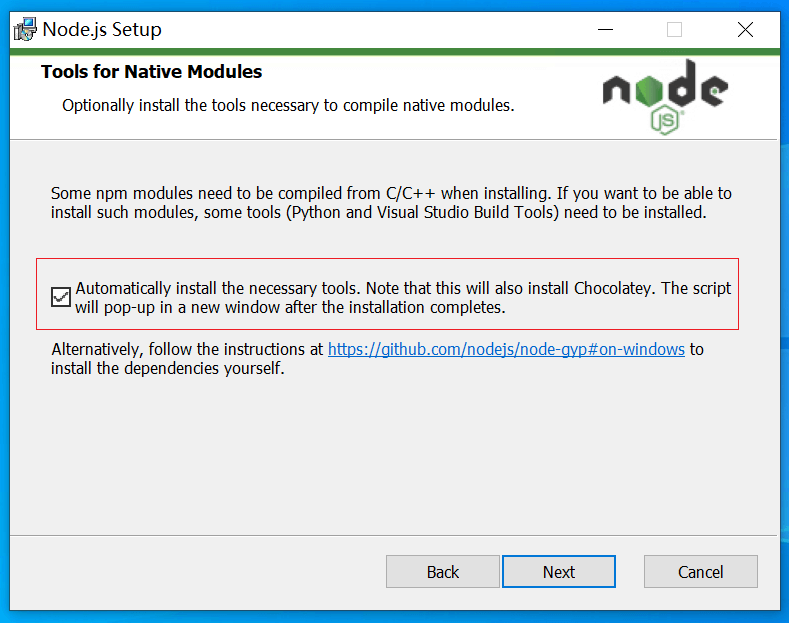
Windows install node-gyp
In the process of initializing the plugin project, ONES CLI will install the /backend of the project depending on it, and the dependent installation exception may occur in the process.
This is usually caused by the lack of tools needed for construction, which requires developers to check and install additional build tools node-gyp during the installation of Node.js.
It should be noted that in some Windows distributions (such as the home version), users are not asked
by default whether they need to use administrator permissions to install Node.js, while node-gpy may
fail due to lack of permissions.
In this case, the developer needs to start Powershell or CMD with administrator permissions and start the Node.js installer with the following instructions:
msiexec /package "C:\foo\baz\node-v16.xx.xx-x64.msi"
If you are correctly installing node-gyp, there are still problems in the process of initializing the plugin project. It is recommended that developers locate, fix, or report the problem from the npm debug log.
Step 3: Install ONES CLI
ONE CLI is a scaffolding tool provided by the open platform for quickly creating plugin projects. You can install ONES CLI using any of the following instructions, including the plugin development tool op.
- npm
- Yarn
- pnpm
npm install -g @ones/cli --registry=https://npm.partner.ones.cn/registry/
# or
sudo npm install -g @ones/cli --registry=https://npm.partner.ones.cn/registry/
yarn global add @ones/cli --registry=https://npm.partner.ones.cn/registry/
# or
sudo yarn global add @ones/cli --registry=https://npm.partner.ones.cn/registry/
pnpm add -g @ones/cli --registry=https://npm.partner.ones.cn/registry/
# or
sudo pnpm add -g @ones/cli --registry=https://npm.partner.ones.cn/registry/
After the installation is complete, you can use the --version command on the command line to verify that the installation is correct and get the version information.
➜ ones --version
1.0.0
For specific instructions, please refer to: ONES CLI
Upgrade ONES CLI
To upgrade the scaffolding later, you can run any of the following instructions:
npm update -g @ones/cli --registry=https://npm.partner.ones.cn/registry/
# or
sudo npm update -g @ones/cli --registry=https://npm.partner.ones.cn/registry/